Corrections Special School District
Career & Technical Education Center
Website Development I
Class No. 12:


CSS Inheritance and Priority System
Today’s Goal
To get a feel for CSS inheritance and the priority system.
Class Resources
CSS: The Missing Manual (PDF) – pages 103-113
Web Programming book reading for THIS class
- pages 152-155
- Child Selectors
- CSS Inheritance
Web Programming book reading for NEXT class
- pages 312-316 and 318-319 (skip section 8.5 for now)
- Introduction
- History of JavaScript
- Hello World Web Page
- Buttons
- Variables
- Identifiers
- Parsing Numbers:
parseIntandparseFloat
Preambles
Collect one last Mid-Course Evaluation form
Questions from our last class or the readings?
Understanding CSS Inheritance
First, let’s begin by defining “inheritance” ...
Second, let’s talk about “streamlining” style sheets ...
- in the example below, note that
h2and.jmhcommenteach appears twice
 1  /* the following styles were added by JMH to make the sample code look as
 2     it does in the slides, that is, white text on a black background */
 3  body {
 4    background-color: black ;
 5    color: white ;
 6  }
 7  h1, h2, .jmhcomment, h1+p, ul,
 8  a:link, a:hover, a:active, a:visited {
 9    color: lime;
10  }
11  h2 {
12    margin-top: 3em;
13  }
14  .jmhcomment {
15    font-style: italic;
16  }
17  /* end of JMH styles */
But be careful! — some properties do not get inherited
- for example, the
borderproperty - “As a general rule, properties that affect the placement of elements on the page or the margins, background colors, and borders of elements aren’t inherited.” (McFarland, p. 83)
“When styles conflict, the more specific style wins out.” (McFarland, p. 85)
- rules governing conflicting styles are the “cascading” part of CSS
Two situations in which CSS properties conflict (p. 92)
- “through inheritance when the same property is inherited from multiple ancestors”
- “when two or more styles apply to the same element”
Cascading Rules
- “nearest ancestor”: “the web browser obeys the style that’s
closest to the tag in question” (McFarland, p. 93)
- example:
<body>style specifies the Verdana font, but a<div>tag within the body specifies the Times font
- example:
- “directly applied”: “properties from a style specifically applied
to a tag beat out any inherited properties”
- note that “directly applied” need not
be
<tag style="..."> - it could also be a style applied through an
idorclassselector, such as<tag id="..." class="...">
- note that “directly applied” need not
be
- many examples of potential conflicts appear on pages 94-95
- if styles don’t conflict, all of them are applied to the element
The “Point” System (McFarland,
p. 108)
- “properties from the most specific style” win
- “specificity” = which is more “specific”? = which most directly applies to the element in question?
- specificity values
- a tag selector is worth 1 point
- a class selector is worth 10 points
- an ID selector is worth 100 points
- an inline style is worth 1,000 points
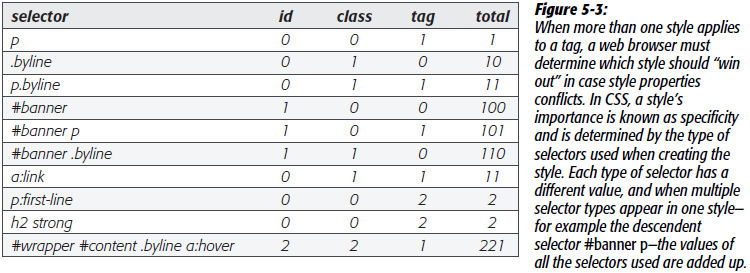
[figure source: CSS: The Missing Manual, by David Sawyer McFarland,
fig. 5-3, p. 109]
- inherited styles have no specificity
- therefore, directly applied styles always win
It is impossible to memorize all these rules
- you have to simply gain familiarity with them as you work with them
- that said, it is worthwhile to review them once or twice and “put them in the back of our mind” so that you have some hope of understanding what’s going on when you encounter them
- this is an example of the underlying computer science that artists and web designers typically don’t worry about
- but it is our job to make pages efficient so that they
- display properly in as many browsers as possible without alteration or conditional code
- are maintainable when the company changes direction or the designers simply change their minds
- contain reusable code so that we can get home for dinner at a reasonable hour
Addressing specificity issues
- regardless of how good you are at this, working with the cascade is challenging
- one way to address particularly complex issues that result in the style you want not
being applied to the elements you want is to enclose your elements in a
<div>or<span>tag with anidattribute and refer to thatidin your rules to ensure that the desired styles are applied- note that an
idhas a weight of 100
- note that an
Advanced Material
Information on advanced selector techniques for students who are interested can be found after the exercise or by clicking here.
Today’s Exercises
Goal: To delve more deeply into CSS by looking at the code needed to render PRO Manual page 7 as a web page.
- Begin by studying the layout of PRO Manual page 7, which is truly quite complex.
- Look at the rendering of Mr. Heines’s version of this page to see how many of the original page’s visual elements he was able to recreate on the web.
- Now look at
for his version (by displaying the page and typing
Ctrl U ) to see the CSS that he used to render the page as desired. - Open a new, blank file in UltraEdit.
- Display Mr. Heines’s version of page 7 in your browser and then type CtrlU to display its source code.
- Click anywhere in the source code and type CtrlA to select it all.
- Type CtrlC to copy what you have selected.
- Return to your blank page in UltraEdit and type CtrlV to paste in the copied code.
- Type CtrlS to save a the copied code into your own Dropbox so that you can work with it.
- A good way to learn the complexities of CSS is to play with modifying code that you get from others. Try commenting out various CSS rules to see how the page renders when those rules are no longer active.
- Note that it is important not to delete rules.
- Rather, simply comment them out by enclosing them
in
/*and*/. - This allows you to comment the rules back in as you experiment with other rules.
- Try modifying rules that you are familiar with to achieve different effects.
- Don’t change the selectors at this time, just change declarations in the declaration block.
- The source code contains rules that you probably haven’t see before. Leave those alone for now and focus on the ones that you already know.
- Be careful, this is tricky! Before you attempt this, make a backup copy of your work so that you can return to a working version of the code if you screw up. 🙃
- Instead of cutting-and-pasting rules to different locations, copy-and-paste them and then comment them out from their original location. This will help you recover if you screw up!
Step 1: Study the resources provided
Step 2: Copy Mr. Heines’s code into your own Dropbox so that you can modify it
Step 3: Experiment with modifying the CSS
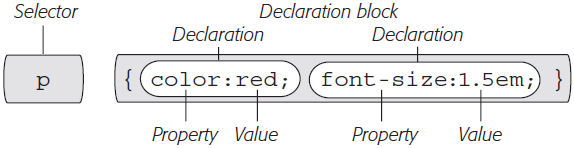
Source: CSS: The Missing Manual by David Sawyer McFarland, Figure 2-2,
2nd edition: page 33, 3rd edition: p. 38
Step 4: Try to streamline the CSS by modifying it to take advantage of inheritance and the cascade
This is Class No. 12. It was last modified on
Saturday, October 21, 2023 at 4:38 PM. Copyright © 2010-2026 by Jesse M. Heines. All rights reserved, but may be freely copied or excerpted for
educational purposes with credit to the author.
Advanced Selector Techniques for Advanced Students
This material is for advanced students, so we will not take the time to discuss it during class.
Achieving a clear understanding of how selectors work is critically important not only for working with CSS, but also because the techniques discussed here are also used with JavaScript, which we’ll look at later in this course.
In addition to applying styles to tags, it is common is to apply a style to an element with a specific ID attribute.
- for example,
#identifier { ... }gets applied to<p id="identifier">...</p> - note how such capabilities reinforce the need to use XHTML and close all tags hierarchically
You can apply a style to groups of tags:
h1, h2, h3, h4, h5, h6 { ... }
You can apply a style to an element using the Document Object Model (DOM):
li a { ... }- applies to all
atags that are descendents (at any level) of alllielements
- applies to all
li > a { ... }- applies to all
atags that are children (that is, direct descendents) of alllielements
- applies to all
h2 + p { ... }- applies to all
ptags that are adjacent siblings of (that is, are at the same hierarchical level as) allh2elements
- applies to all
a[href="home.html"]- applies to all
atags withhrefattributes whose value ishome.html
- applies to all
a[href^="https://"]- applies to all
atags withhrefattributes whose value begins withhttps
- applies to all
a[href$=".xml"]- applies to all
atags withhrefattributes whose value ends with.xml
- applies to all
a[href*="cssdweb.edu"]- applies to all
atags withhrefattributes whose value containscssdweb.edu
- applies to all
- summary of the previous five
= ->“is”^= ->“begins with”$= ->“ends with”*= ->“contains”- note that these are the same as the analogous symbols used in other symbolic languages
You can even use an asterisk as a “wildcard” to apply a style to all HTML tags:
- * { ... }
Pseudo-classes
a:link,a:visited,a:hover, anda:active:first-letterand:first-line –used for graphic effects such as drop caps and bolded first lines:beforeand:after –generated content used with classes- book example:
p.tip:before{ content: "HOT TIP! " } :first-child –selects just the first of, for example, a set oflielements:focus –like the:hoverpseudo-class, affects rendering when the user selects an element
Separating content from rendition
- as we have seen, during development, it is sometimes easier to write in-line CSS or have the CSS stylesheet in the same file as our HTML
- what are the pros and cons of doing this?
- in most cases, it is best to have the CSS in one or more independent files
- these are typically stored in a subdirectory named
css
- these are typically stored in a subdirectory named