Corrections Special School District
Career & Technical Education Center
Website Development I
Class No. 6:


Extensive Control of Text
Today’s Goal
To add class and id attributes to HTML elements and use those
as CSS selectors.
Class Resources
Web Programming book reading for THIS class
- pages 107-117
line-heightProperty- Text Properties
- Border Properties
- Element Box,
paddingProperty,marginProperty
Web Programming book reading for NEXT class
- pages 218-239
- Introduction
aElement- Relative URLs
index.htmlFile- Web Design — skim
- Navigation Within a Web Page
- CSS for Links
aElement Additional Details
Additional References
- CSS Cheat Sheet (PDF file)
- CSS3 Cheat Sheet (PDF file)
Review
Questions from our last class or the readings?
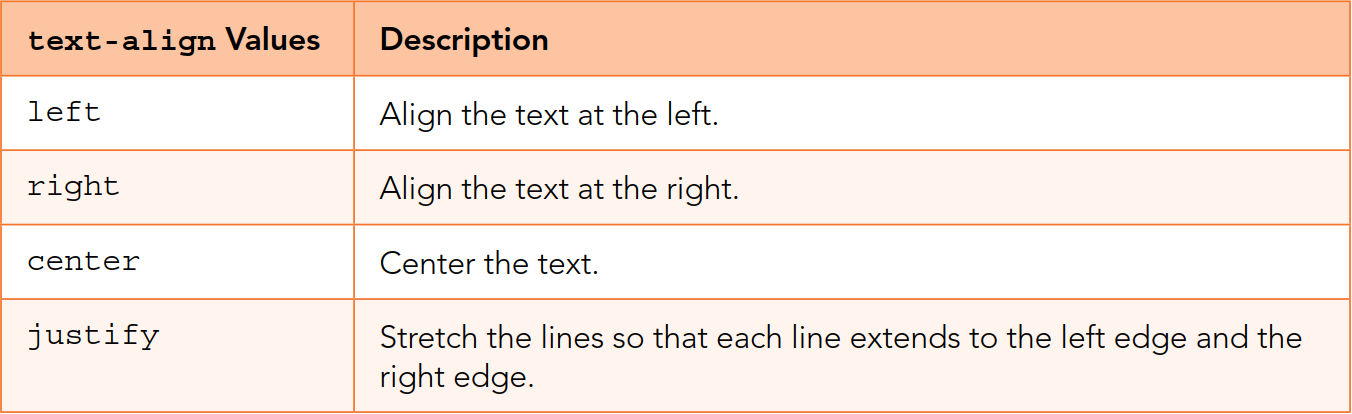
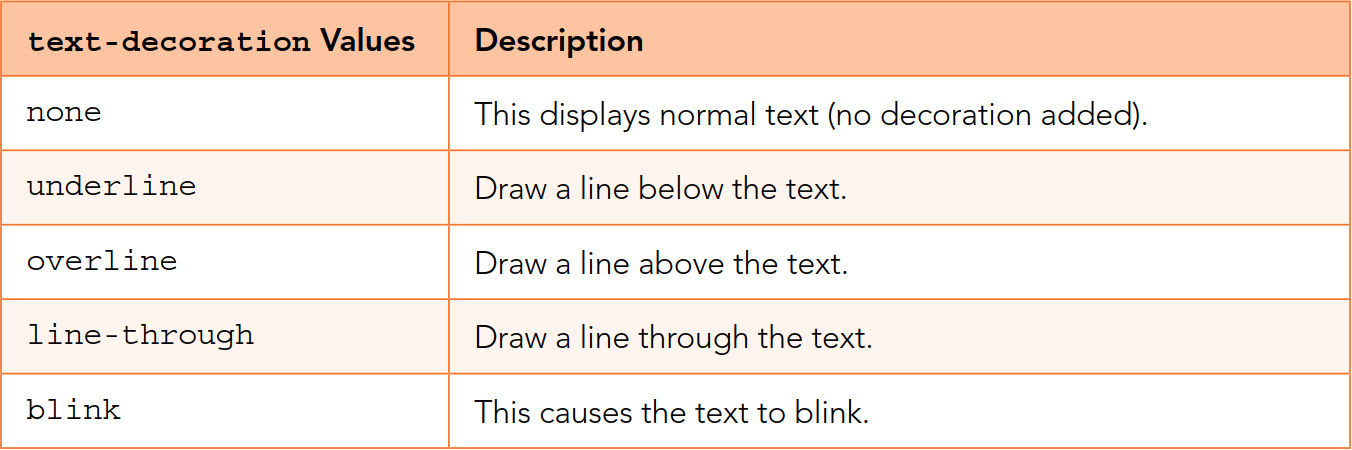
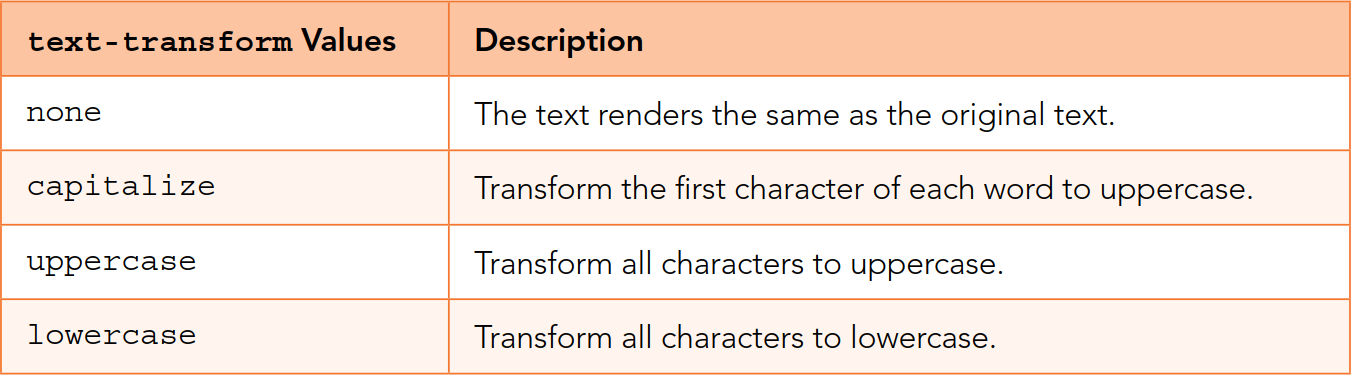
Text Properties
Text Alignment
Dean, Web Programming, p. 109
Text Decoration
Dean, Web Programming, p. 109
Text Transformation
Dean, Web Programming, p. 110
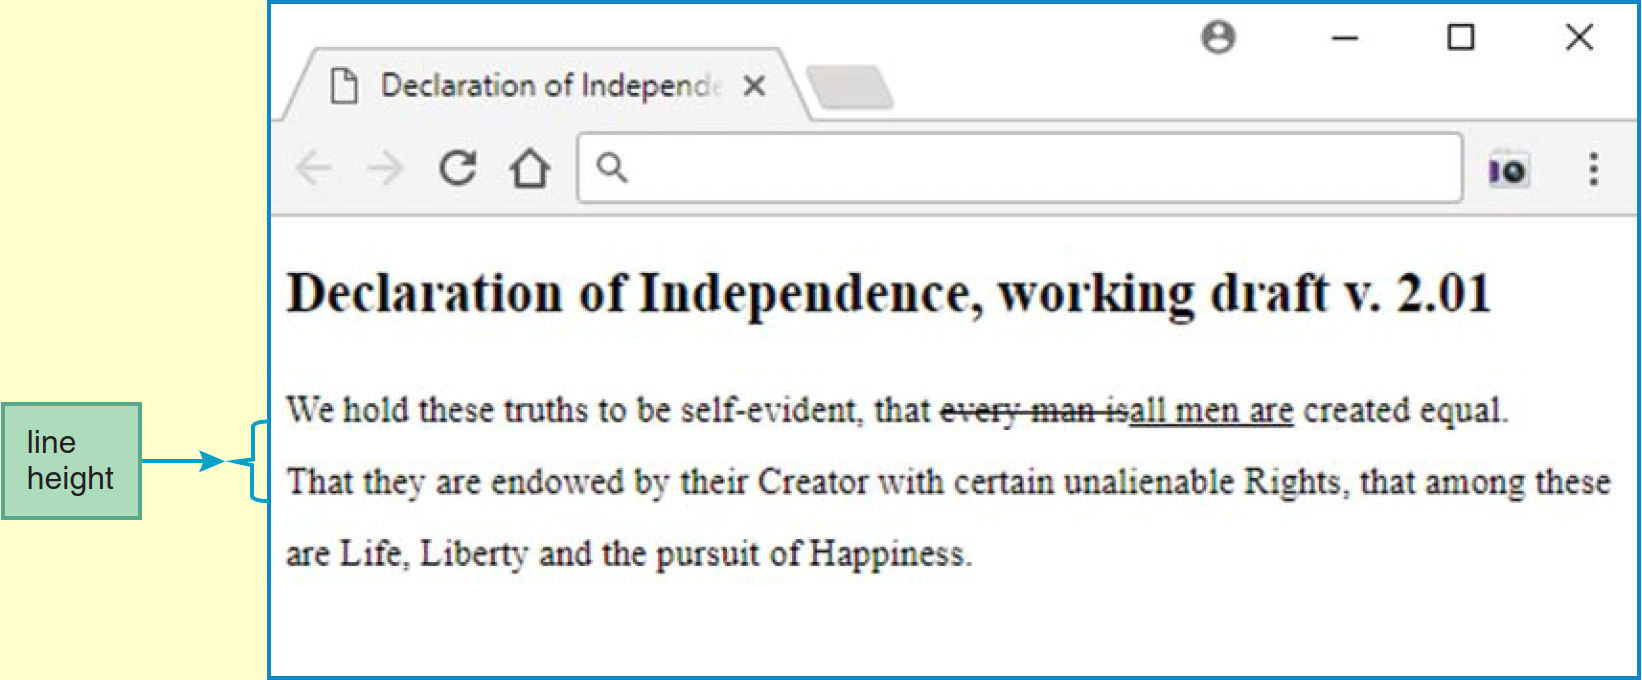
Paragraph Spacing
- the CSS property is
line-height - line spacing = “leading”
- normal line height is 120% — why?
Dean, Web Programming, fig. 3.18, p. 108
Control of Text Spacing (with a quote from Defense Attorney Bryan Stevenson)
word-spacing: 3px ;letter-spacing: -1px ;- “kerning”
Each of us is more than the worst thing we’ve ever done.
Each of us is more than the worst thing we’ve ever done.
Each of us is more than the worst thing we’ve ever done.
Each of us is more than the worst thing we’ve ever done.
AVAILABLE
AVAILABLE
ALTA, Inc.
Indentation
- the CSS property is
text-indent - indentation affects only the first line of text
<p style="text-indent: 2em;">
Obviously, prison time is not how someone wants to live their life, but rather than view this as lost time, you can choose to focus on what opportunities are in front of you.
Many men incarcerated at the Concord Men’s Prison have thrived in this environment and gone on to be very successful in prison and after. These men worked hard to improve themselves by participating in whatever prison programs helped them achieve their goals, whether this meant enrolling in high school classes, vocational training, improving personal fitness, focusing on family or pursuing a college degree.
- negative indentation creates a “hanging indent”
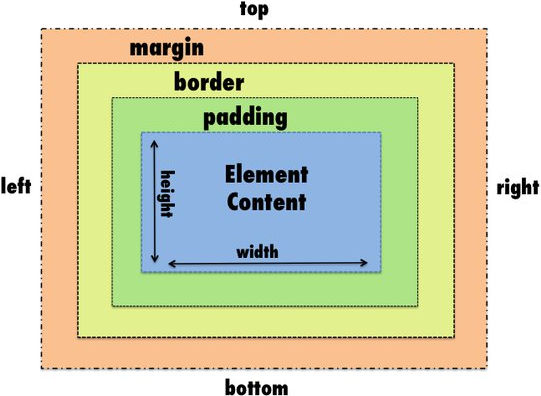
Margins and Padding
- remember that padding is inside the border
- margin is outside the border
- margin and padding parameters
- when one parameter is supplied, it applies to all sides
margin="1em"
- when two parameters are supplied, the first applies to the top &
bottom and the second applies to the left & right
margin="2em 1em"
- when four parameters are supplied, they apply in the order: top right
bottom left
margin="2em 3em 2em 1em"
- to remember the order Top Right Bottom Left, think “TRBL” (“trouble”)
source: https://www.quora.com/What-are-the-differences-between-margin-and-padding
Pseudo-Elements
- these elements are appended to other selectors
- for example,
- adding
:first-letterto aptag styles the first letter of the paragraph - adding
:first-lineto aptag styles the entire first line of the paragraph
<style>
  p { text-indent: 2em; }
  p:first-letter { font-size: 2em; }
  p:first-line { font-weight: bold; }
</style>
- note that there is no space between the tag and the colon (
:) - note how each style rule adds to the previous rule
Obviously, prison time is not how someone wants to live their life, but rather than view this as lost time, you can choose to focus on what opportunities are in front of you.
Many men incarcerated at the Concord Men’s Prison have thrived in this environment and gone on to be very successful in prison and after. These men worked hard to improve themselves by participating in whatever prison programs helped them achieve their goals, whether this meant enrolling in high school classes, vocational training, improving personal fitness, focusing on family or pursuing a college degree.
Today’s Exercise
Goal: To continue working with CSS and to see how an element’s rendering can be changed dynamically.
- Look at the code in Figure 3.21 on page 116 of our textbook.
- Run this code by clicking here.
- If you’re reading these instructions on paper, go to the class website on your computer to find the clicking here link above and click it.
- Note that the page looks just like Figure 3.20 on page 115.
- Now click either the HOT or COLD button and note what happens. Click the button again to see what happens next. Do the same with the other button. This exercise will lead you through adding a third button that behaves similarly.
- Open the UltraEdit editor on your computer. This should open a blank window that is ready for editing.
- If your editor is already open, click File and then New to open a blank window.
- Leave the editor open and return to the page you were just experimenting with in your Microsoft Edge browser.
- As we have done previously, type
Ctrl U to view the source code for the starter code page. - Click anywhere in the browser window and type
Ctrl A to select all of the code. - Type CtrlC to copy the code.
- Return to UltraEdit and type
Ctrl V to paste the code into the blank editor window. - Type
Ctrl S to save your copy of the starter code to your dropbox. Name the file as you see fit. - Open the file you just saved in Microsoft Edge to ensure that you have saved it correctly.
- Study the code and work to add a button labeled WARM between the HOT and COLD buttons.
- Use green as the initial background color of your WARM button.
- To do this you need to add code to both the
bodyandstylesections of the page. - Look at the
Togglefunction and see if you can figure out how to add the same functionality to your new WARM button that exists for the HOT and COLD buttons. - Now that you thoroughly understand how this web page is implemented, think about how you could adapt it to create an online menu. Here is the basic idea:
- Each menu item should be listed on a line by itself, preceded by a round button that the user can click.
- If the button has a red background, the item has not been selected.
- Thus, all buttons should initially have red backgrounds.
- If the button has a green background, the item has been selected.
- Here is some code to help you get started.
Step 1: Understand what you are to do
Step 2: Copy the starter code to your dropbox
Step 3: Add a third button to the page
Step 4 (for those of you who have time): Convert the starter code to a menu
Hamburger
Cheeseburger
Hot Dog
French Fries
Cole Slaw
      .label {
        background-color: red;
        border-radius: 50%;
        padding-left: 0.6em;
        padding-right: 0.6em;
        margin-right: 0.5em;
      }

      <span class="label" onclick="Toggle( this )"></span> Hamburger<br>
This is Class No. 6. It was last modified on
Saturday, October 21, 2023 at 4:38 PM. Copyright © 2010-2026 by Jesse M. Heines. All rights reserved, but may be freely copied or excerpted for
educational purposes with credit to the author.