Website Development I
Class No. 4:



CSS Selectors and the span and div Elements
Today’s Goal
To add class and id attributes to HTML elements and use those
as CSS selectors.
Class Resources
Web Programming book reading for THIS class
- pages 79-88
- Class Selectors
- ID Selectors
spananddivElements- Cascading
styleAttribute,styleContainer
Web Programming book reading for NEXT class
- pages 88-107
- External CSS Files
- CSS Properties
- Color Properties
- RGB Values for Color — skim
- Opacity Values for Color — skim
- HSL and HSLA Values for Color — skim
- Font Properties — IMPORTANT
Additional References
- CSS Cheat Sheet (PDF file)
- CSS3 Cheat Sheet (PDF file)
Review
It wasn’t clear to some of you that I had created a starter file for Tuesday’s exercise.
- This was my fault for not pointing this out more clearly in the instructions.
- Here are the instructions once again for those of you who have only just gotten started on that exercise.
- Open the UltraEdit editor on your computer. This should open a blank window that is ready for editing.
- Leave the editor open and click here to open the starter code in your Microsoft Edge browser.
- If you’re reading these instructions on paper, go to the class website on your computer to find the click here link above and click it.
- Type CtrlU to view the source code for the starter code page.
- Click anywhere in the browser window and type CtrlA to select all of the code.
- Type CtrlC to copy the code.
- Return to UltraEdit and type CtrlV to paste the code into the blank editor window.
- Type CtrlS to save your copy of the starter code to your dropbox. Name the file as you see fit.
- Open the file you just saved in Microsoft Edge to ensure that you have saved it correctly.
Step 2: Copy the starter code to your dropbox
Today’s exercise continues along the same vein.
- If you haven’t made significant progress on Tuesday’s exercise, I recommend that you continue working on that exercise before starting today’s.
Do you have questions or issues from our last class or the readings?
Selector Types – Revisited
Tag Selectors
We worked with these in our last class.
Class Selectors
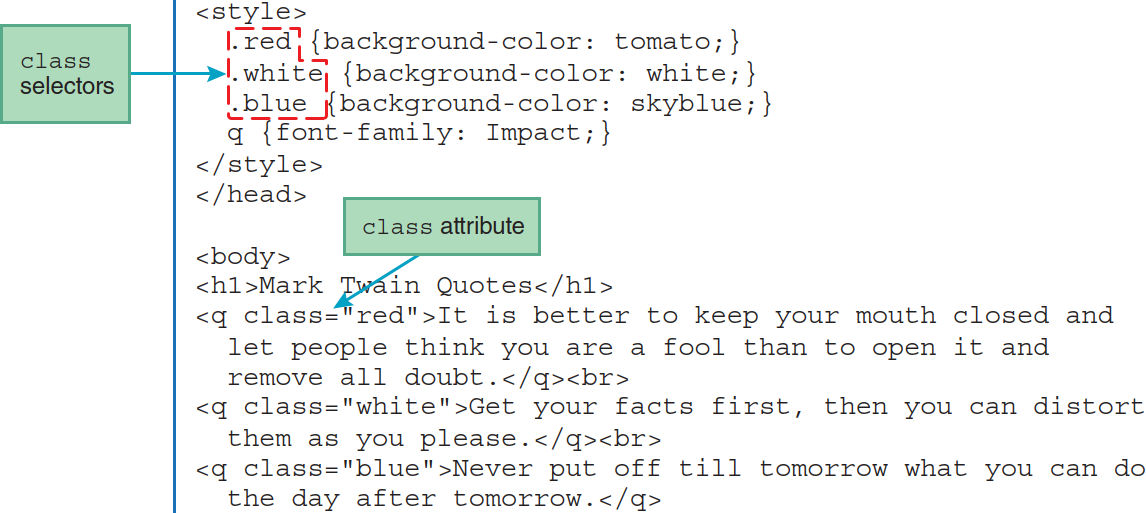
A class is applied to a tag using the class attribute.
Example
<p class="reverse">This paragraph is rendered in "reverse video",
    that is, with a dark background and light-colored letters.</p>
This paragraph is rendered in "reverse video", that is,
with a dark background and light-colored letters.
Applying Classes to Elements
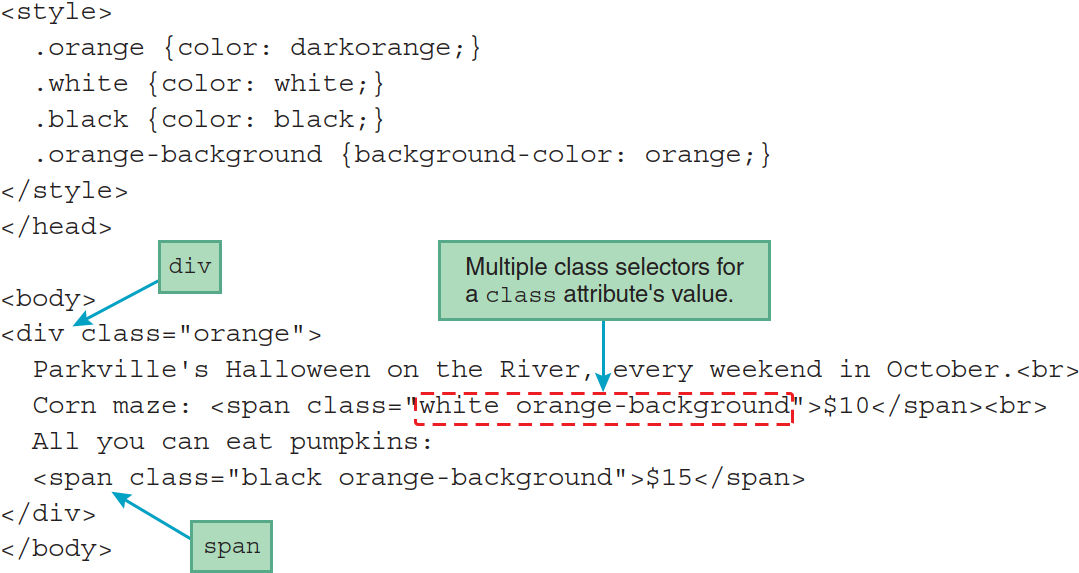
- classes may be applied to almost any HTML start tag using
the
classattribute - that is, class styles can be applied to elements of different types
- many elements on a page can have the same class
- this allows a way to style those elements the same, with absolute consistency
- only letters, numbers, hyphens, and underscores can be used in class names
Styling Classes with CSS
- class selectors begin with a dot or period (
.)
 .reverse {
   background-color: #600 ;  /* dark brown */
   color: #FFC ;             /* light yellow */
 }
Syntax
.classname {
  1st-property: 1st-property’s-value;
  2nd-property: 2nd-property’s-value;
}
➤ Notice the dot or period (.) before the class name.
Dean, Web Programming, p. 80
Dean, Web Programming, p. 81
Examples
.time-format {
  font-family: monospace, sans-serif ;
  font-size: 18pt ;
  font-weight: bold ;
  color: red ;
}
<p class="time-format">20:36 hours = 8:36 PM</p>
<p>20:36 hours = <span class="time-format">8:36 PM</span></p>
<p>20:36 hours = <em class="time-format">8:36 PM</em></p>
Result
20:36 hours = 8:36 PM
20:36 hours = 8:36 PM
20:36 hours = 8:36 PM
ID Selectors
- IDs provide a direct way to qualify a specific selection: by its ID
- IDs are intended to be unique on a page
- the behavior of pages that contain the same ID for two or more elements is unpredictable
- ID selectors begin with a pound (or hash) sign (
#)
Syntax
#idname {
  1st-property: 1st-property’s-value;
  2nd-property: 2nd-property’s-value;
}
➤ Notice the pound or hash sign (#) before the ID’s name.
Dean, Web Programming, p. 83
Example
#message {
  font-variant: small-caps ;
  font-weight: bold ;
  color: blue ;
}
<p id="message">Any situation not covered by the above rules will be addressed as it occurs by the officer in charge.</p>
Result
Any situation not covered by the above rules will be addressed as it occurs by the officer in charge.
span and div Elements
These elements do not have built-in renditions.
- However, the
divtag will cause a line break, while thespantag will not. - The purpose of these elements is to give you sections that you can style with CSS.
Dean, Web Programming, p. 85
Dean, Web Programming, p. 85
<div> and <span> are both
container elements
- they contain other elements, such as
<h2>and<p>, to create sections that can then be styled with CSS - many of the newer HTML5 semantic elements perform a similar function
The difference between these two elements is that:
<div>elements work like paragraphs in that the cause line breaks<span>elements are inline and do not cause line breaks
The Cascade
The C of CSS stands for cascading
- style sheets are collections of rules
- cascading comes into play when two rules apply to the same element but contradict each other
- if the two rules do not contradict each other, both will apply, such as boldface and italic
- for those of you who may have worked in object-oriented languages, note that cascading is not the same as inheritance
- “CSS specifies a priority scheme to determine which style rules apply if more than one rule matches against a particular element. In this so-called cascade, priorities or weights are calculated and assigned to rules, so that the results are predictable.” (Wikipedia)
- we will look at the priority scheme more closely in another class
Today’s Exercise
Note: Today’s exercise is complex. Like last week, I do not expect you to finish this exercise in one day. We will continue working on it in our next class. Some of the styling will be easier to do when we look at additional types of selectors and other HTML elements.
Goal: To render PRO Manual page 47 in the browser so that it looks as close as possible to the way it looks in the manual.
Procedure:
- Look at page 47 of the PRO Manual and notice that:
- The page header after the page number, “|CTEC: Business & Computer education,” is in a light gray color. (“Education” should also be capitalized here.)
- The main page title at the top of the page, “CTEC: BUSINESS & COMPUTER EDUCATION,” is in white text.
- The box containing the main page title has rounded edges.
- The page text is enclosed in a light gray border.
- The “Foundation Classes” section is indented.
- The page has additional text formatting characteristics, but ignore the icon in the page header and the CTEC logo image for now.
- Open the UltraEdit editor on your computer. This should open a blank window that is ready for editing.
- Leave the editor open and click here to open the starter code in your Microsoft Edge browser.
- If you’re reading these instructions on paper, go to the class website on your computer to find the click here link above and click it.
- Type CtrlU to view the source code for the starter code page.
- Click anywhere in the browser window and type CtrlA to select all of the code.
- Type CtrlC to copy the code.
- Return to UltraEdit and type CtrlV to paste the code into the blank editor window.
- Type CtrlS to save your copy of the starter code to your dropbox. Name the file as you see fit.
- Open the file you just saved in Microsoft Edge to ensure that you have saved it correctly.
- Attempt to implement these formatting characteristics using CSS. Here are the CSS properties I used in my version that that you might also want to use.
- You will need the
<div>and<span>tags to do a really good job on this exercise. Note where I have included these in the starter code and assigned each an ID.
Step 1: Understand what you are to do
Step 2: Copy the starter code to your dropbox
Step 3: Add CSS to format the page as desired
      font-family: Verdana, Arial, sans-serif ;
      width: 600px ;
      font-style: italic ;
      font-weight: bold ;
      color: white ;
      color: RGB( 121, 143, 156 ) ;  (this is the color of the grayish blue text)
           or  color: lightblue ;
      background-color: RGB( 121, 143, 156 ) ;
           or  background-color: lightblue ;
      border: 2px solid RGB( 121, 143, 156 ) ;
           or  border: 2px solid lightblue ;
      border-radius: 0 10px 10px 0 ;
      float: left ;   /* for the student icon */
      float: right ;  /* for the CTEC logo */
      height: 50px ;
      margin-right: 0.5em ;
To see what can be done, compare page 47 of the PRO Manual with my HTML version of this page.
This is Class No. 4. It was last modified on
Saturday, October 21, 2023 at 4:38 PM. Copyright © 2010-2025 by Jesse M. Heines. All rights reserved, but may be freely copied or excerpted for
educational purposes with credit to the author.

