Corrections Special School District
Career & Technical Education Center
Website Development I
Class No. 3:


Introduction to Cascading Style Sheets
Today’s Goal
To get started using CSS to style HTML elements.
Class Resources
Web Programming book reading for THIS class
- pages 73-78
- Introduction
- CSS Overview
- CSS Rules
- Example with Type Selectors and the Universal Selector
- CSS Syntax and Style
Web Programming book reading for NEXT class
- pages 79-88
- Class Selectors
- ID Selectors
spananddivElements- Cascading
styleAttribute,styleContainer
Additional References
- CSS Cheat Sheet (PDF file)
- CSS3 Cheat Sheet (PDF file)
- CSS Named Colors - List (PDF file)
- CSS Named Colors - Swatches, Part 1 (JPG file)
- CSS Named Colors - Swatches, Part 2 (JPG file)
- Main part of PRO Manual page 15 enhanced by CSS (PDF file)
Review
Questions from our last class or the readings?
Concepts
What are styles?
- a style is the set of
characteristics that define how an element is
rendered
- font size, color, weight
- text justification
- margins and borders
- page position
- most (but not all) HTML tags have built-in styles
- these styles can be changed locally for individual elements
using the
styleattribute- these are referred to as inline styles
- they can be changed globally for all elements of a specific type using style sheets
- style sheets can also define generic classes of styles that can be applied to any type of element
- styles can be combined and inherit from one another in a hierarchical manner
- inheritance in this manner is known as cascading
- this is where the term Cascading Style Sheets (CSS) comes from
What is the purpose of styles?
- to define the rendering of HTML elements, which define the look and formatting of those elements
- CSS separates document content from rendition (presentation)
- much more control is provided by CSS than is possible with HTML attributes
- one can also display a page differently based on screen size, which is the essence of responsive web design for mobile and other devices
Inline Styles vs. Internal Style Sheets
Inline Styles
- applied directly to HTML elements via attributes
<p style="color: red;">This is red text.</p>
This is red text.
- example on page 87 of the Web Programming textbook
                      element
┌────────────────────────┴────────────────────────────┐
  attribute         attibute              element
    name              value               content
    ┌─┴─┐  ┌────────────┴─────────────┐  ┌───┴───┐
<h2 style="text-decoration: underline;">Welcome!</h2>
└┬┘        └───────┬──────┘  └───┬───┘            └─┬─┘
opening           CSS        Property            closing
tag             Property       Value               tag
- multiple styles can be applied to the same HTML
element, separated by semi-colons (
;)
<p style="color: red ;
    font-style: italic ; text-decoration: underline">

      This is red, italic, underlined text.</p>
This is red, italic, underlined text.
Internal Style Sheets
- style sheets are collections of rules
- they are defined in the
<head>section
Source: CSS: The Missing Manual by David Sawyer McFarland, Figure 2-2,
2nd edition: page 33, 3rd edition: p. 38
- each style sheet entry (as above) is called a rule
- structure
<head>
  <style>
    /* rules go here */
  </style>
</head>
- example
<head>
  <style>
    p {  /* this rule applies to all p elements */
      color: red ;
      font-style: italic ;
      text-decoration: underline ;
    }
  </style>
</head>
<body>
  <p>This is red, italic, underlined text.</p>
  <p>This text will also be red, italic, and underlined.</p>
</body>
This is red, italic, underlined text.
This text will also be red, italic, and underlined.
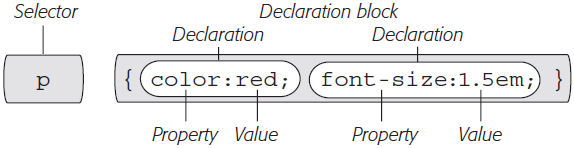
Tag (or Element) Selectors
- these apply to all elements with the same HTML tag
- (we looked at these briefly in our last class)
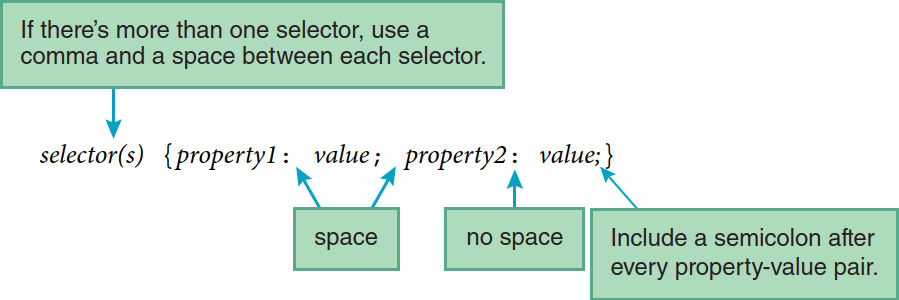
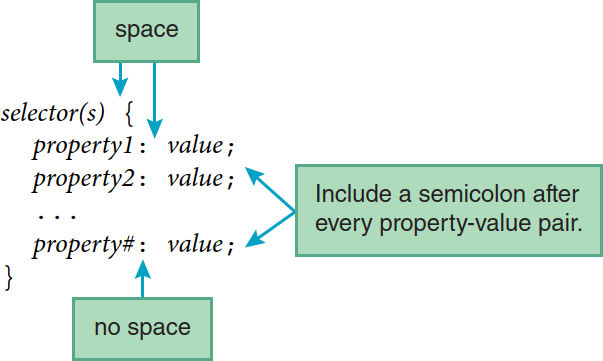
Syntax
tag {
  1st-property: 1st-property’s-value;
  2nd-property: 2nd-property’s-value;
}
➤ Notice the colon (
:) between the property and its value and the semi-colon (;) at the end of each rule.
Dean, Web Programming, p. 78
Dean, Web Programming, p. 78
Example
em {
  color : green ;       /* we are adding properties to the em tag */
  font-weight : bold ;  /* the text will still render in italics because that property is built-in */
}
<p>This booklet was developed by residents, so it is <em>not</em> an official rule book.</p>
<p>You can have up to 20 people on your visitor list. If you remove someone from your list, he or she <em>cannot be added back on for one calendar year</em>.</p>
Result
This booklet was developed by residents, so it is not an official rule book.
You can have up to 20 people on your visitor list. If you remove someone from your list, he or she cannot be added back on for one calendar year.
➤ Remember that the text is italicized because italicization is a built-in property of the <em> tag. However, this can be changed by CSS, too.
A Comment on Comments
- as you see above, CSS comments are enclosed
in
/*and*/symbols - managing the cascade (which we will have to do in future classes) very quickly gets very complex
- it is therefore critical to write precise selectors (which we will talk about more in future classes)
- ... and it is critical to document complex selector specifications
Today’s Exercise
Goal: To render the main part of PRO Manual page 15 in the browser so that it looks close to the way it looks in the manual, but with a few enhancements.
Procedure:
- Look at the part of page 15 of the PRO Manual that starts with “Rules of Displays of Affection.” Notice that:
- The page font is sans-serif, meaning that it does not have small, decorative lines (called “serifs”) on the characters.
- The main titles “Rules of Displays of Affection” and “What activities can we do during visits?” are large and in boldface type.
- The paragraph that starts with “Any Situation” is in smaller type, but it is also in boldface.
- There is a section that appears in an indented box.
- That box has a bluish-gray border and light bluish-gray shading.
- The text in that box is centered.
- Now look at the slightly enhanced version of that part of the text that I created using CSS. Notice that:
- The large titles are blue.
- The paragraph about kissing is red.
- The small title is green and in italics.
- The box looks pretty much like the one in the PRO Manual.
- Finally, look at the starter page for this exercise and notice that it is missing the nice formatting of the enhanced version. Your task is to add CSS code to the starter page to make it look like the enhanced version.
- Open the UltraEdit editor on your computer. This should open a blank window that is ready for editing.
- Leave the editor open and click here to open the starter code in your Microsoft Edge browser.
- If you’re reading these instructions on paper, go to the class website on your computer to find the click here link above and click it.
- Type CtrlU to view the source code for the starter code page.
- Click anywhere in the browser window and type CtrlA to select all of the code.
- Type CtrlC to copy the code.
- Return to UltraEdit and type CtrlV to paste the code into the blank editor window.
- Type CtrlS to save your copy of the starter code to your dropbox. Name the file as you see fit.
- Open the file you just saved in Microsoft Edge to ensure that you have saved it correctly.
- Start by inserting your name where indicated on line 11 of the starter code. Then insert your initials, today’s date, and the current time on line 12.
- Note that the starter code already has an internal style sheet in
the
headsection. I have supplied abodyselector in that sheet for which I added CSS rules to display the page text in a sans-serif font (Verdana) and limit the page width to 600 pixels. - Look over the rest of the starter code to identify the elements that you will want to select and style.
- Add additional selectors to the style sheet and appropriate CSS rules for those selectors to display the page as in my enhanced version. Below are the various rules that I used. You are welcome to use these, but you need to figure out where to put them to make the page appear as desired.
- Add additional CSS to style the page in any way you like. For example, if you’d like to experiment with other CSS rules and different colors, see the Additional Resources for this class.
- CSS Cheat Sheet (PDF file)
- CSS3 Cheat Sheet (PDF file)
- CSS Named Colors - List (PDF file)
- CSS Named Colors - Swatches, Part 1 (JPG file)
- CSS Named Colors - Swatches, Part 2 (JPG file)
Step 1: Understand what you are to do
Step 2: Copy the starter code to your dropbox
Step 3: Add CSS to format the page as desired
      color: blue ;
      color: green ;
      font-style: italic ;
      color: red ;
      font-weight: bold ;
      padding: 12px 24px ;
      border: 3px solid silver ;
      background-color: azure ;
      text-align: center ;
This is Class No. 3. It was last modified on
Saturday, October 21, 2023 at 4:38 PM. Copyright © 2010-2026 by Jesse M. Heines. All rights reserved, but may be freely copied or excerpted for
educational purposes with credit to the author.